TheGallery block allows you to easily add multiple photos and automatically arrange them in a gallery. You can control the number of columns and the size of the images in the gallery.
The Gallery block can be added to a page by clicking on the Block Inserter (+) icon and selecting the Gallery block.

Alternatively, you can type /gallery and press Enter.

Detailed instructions on adding blocks
Block toolbar
Each block has its own block-specific controls that allow you to manipulate the block right in the editor.
The Gallery block has a toolbar for the individual images as well as a toolbar for the entire Gallery block.

For the Gallery block
The main options in the Gallery block toolbar are:
- Transform to
- Block moving handles
- Drag and drop
- Move up and down
- Change alignment
- Caption
- Add button
- More options
Transform to

You can transform or change the block to another block including the Group, Image, and Column blocks.
When you change the block type to the Image block, every image in your gallery will be converted into a single image block.
Block moving handles

The block-moving handles allow you to move the block up and down the editor. Use the six dots icon to drag and drop the Gallery block and place it anywhere on the page. Alternatively, click on the up and down arrows to move the block up or down.
Get more information about moving a block within the editor.
Change alignment

- Align left – Make the block align-center
- Align center – Make the block alignment centered
- Align right – Make the block align-right
- Wide width – Increase the width of the block beyond the content size
- Full width – Extend the block to cover the full width of the screen.
Wide widthandFull width alignment options are only available if they are enabled in your theme.
Caption
You can add this by clicking on the caption icon on the settings toolbar.

Adding images
TheAdd button in the Gallery block lets you add images to the gallery. You have two options to add images to the Gallery block: Open Media LibraryandUpload.

The Upload option allows you to upload a new image or multiple images to the Gallery block and to your media library. The Media Library option lets you select from previously uploaded images in your Media Library.
You can also drag and drop multiple images at the same time from your explorer or finder window into the Gallery block.
Alternatively, you can open the main inserter panel on the editor and open the media tab. Then, you can drag and drop images from the media library and Openverse into the Gallery block.
Options
These controls give you the option to copy, duplicate, and edit your block as HTML.
Read about these and other settings.
Toolbar for images in the gallery
Move images
After you add images to the Gallery block, you can change the order of images in the gallery. Click on an image and in the block toolbar use the move leftandmove right arrow handles to arrange the images as you like.

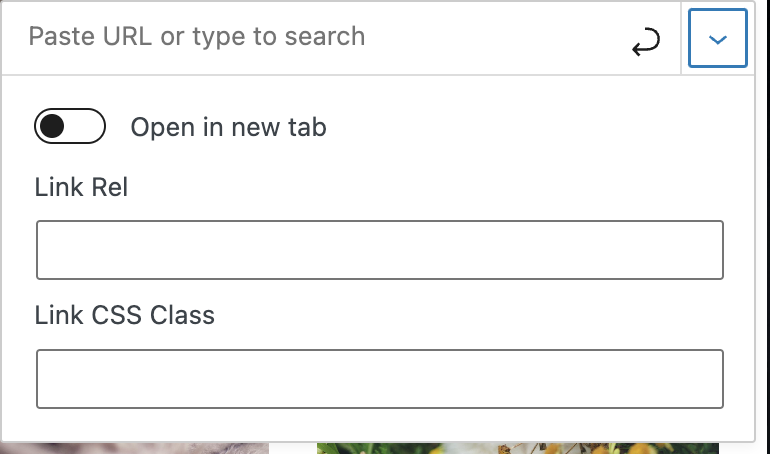
Add a link to an image
To add a link to an image, click the link icon in the block toolbar for the selected image. You can paste a URL for the link, type in the text field to search for a page. You can also link to the Media file of the image or the Attachment Page for the image.

You can change the link settings by clicking the down arrow in the top right corner. You can choose to open the link in a new tab, add CSS class for the link and link rel attribute, if needed.
After you add a link to the image, you can click the link icon in the block toolbar and choose the pen icon to edit the link or the X icon to delete the link.

Crop an image
Here’s a video showing how you can crop an image in the gallery, zoom in, rotate and crop by keeping the aspect ratio of the selected image.
Replace an image
You can replace images in your gallery with the Replace button in the block toolbar of the selected image. This will allow you to upload a new image to the media library or select another image from your library.

Remove an image
To remove an image from your gallery, select the image in the gallery and either click delete on your keyboard or select the three-dot menu on the block toolbar of the selected image and select Remove Image.

Adding captions
Caption for images
You can caption your images individually by editing the “Add caption” text with the image.

Caption for the gallery
You can add this by clicking on the caption icon on the block settings toolbar.
Block settings
Every block has specific options in the editor sidebar in addition to the options found in the block toolbar. If you do not see the sidebar, simply click the ‘sidebar’ icon.

For the Gallery block
Columns

You can choose how many columns your Gallery block can have.
Select between 1 column and 8 columns. Keep in mind that you can only select as many columns as you have images.
This means that if you add 4 images, you’ll be given the option for a maximum of 4 columns. This number will increase as you add more images until you reach the maximum of 8. Even if you add more images to the Gallery, you will not be able to add more than 8 columns.
Your images will automatically arrange themselves to look good no matter how many columns you select. Try changing the setting and see what you like best.
To change the setting you can either manually enter the number of columns you want or visually change the number by using the slider to drag the number up and down.
Crop images
You can select whether or not you’d like all of your images to be cropped in your Gallery block.
This option is useful if you have images of varying sizes and shapes. Cropping them will make the images in each row of the gallery the same size. You can toggle this option on and off to see which way you prefer.
Link to
You have 3 options for linking the images in your gallery: Attachment Page, Media File, and None. This determines what happens when your visitors click on the images in your gallery. You can also add custom links for each image from the block toolbar of the selected image.
- Attachment page: Selecting this option will link the image to its WordPress media attachment page. This is an informational page about your image, which includes the image, the caption, the image description, and a comment field.
- Media file: Selecting this option will link the image to the image file in the original size in a new browser window.
- None: Selecting this option will not link the image to anything.
Image sizes
The Image Size setting allows you to set all the images to the size you choose.
- Thumbnail: Displays a small thumbnail-sized version of your image on the page/post. Note, by default the Thumbnail size is a square, so some cropping of your original image may occur.
- Medium: Displays a medium-sized version of your image on the page/post. This is a good size to use with Left/Right alignments, as it leaves sufficient space for legible text to either side.
- Large: Displays a large-sized version of your image on the page/post. Note: WordPress will determine the width of the content column of your theme, and display the largest possible image for that space.
- Full Size: Displays a full-sized version of your image on the page/post. Note: WordPress will determine the width of the content column of your theme, and display the largest possible image for that space. If your original image is larger than this column width, the full size of the image may not be displayed.
Note:For these images sizes to work, your theme needs to support them.
Style Settings
You can access the Style settings for the Gallery and Image block by clicking on the Styles tab.

Color
The Gallery blockprovides color settings options to change the text, background, and link colors for the block
For details, refer to this support article: Color settings overview
Dimensions
The Gallery blockprovides dimension settings options to add padding and margin.
For details refer to this support article: Dimension settings overview
Advanced settings

Block Name field lets you add a name for the gallery, which will appear on the editor’s list view. That will help you to navigate the list view and find the right block easier.
HTML anchor allows you to do “page jumping” to the gallery. Page jumping, also sometimes referred to as anchor links, is where you click a link and instantly get moved somewhere further up or down a long page.
To enable this, you put an HTML anchor in the Advanced settings in the Gallery block. You can then create a link to this anchor anywhere on the page and it scrolls to the Gallery block.
The advanced tab also lets you add a CSS class to your block, allowing you to write custom CSS and style the block as you see fit.
For images in the gallery
Image settings

For each image in the gallery, add alternative text to help with accessibility. ALT text can describe the purpose of the image. Leave the ALT text field empty if the image is purely decorative.
Resolution
The Resolution setting allows you to set the image size for individual images in the gallery. You can choose between Thumbnail, Medium, Large and Full size.
There’s also the Expand on click toggle to enable the lightbox feature. This will let visitors to enlarge the image into its full size by clicking on the image.
Note:For these image sizes to work, your theme needs to support them.
Styles
You can vary the styles of the images in the Gallery block by choosing the Styles settings. You have two different style options in the block sidebar, when you select an image.

Filter options
You can create a filter effect on images without actually changing the original image.
The filter option allows you to add this filter color to your block content from the block toolbar.
Read more about the filter options.
Border
The Gallery block provides border settings options to add border color, width, and radius.
For details refer to this support article: Border settings overview

Advanced settings

The advanced settings for each image have a Title attribute, HTML anchor, and CSS class fields.
The Title attribute field is designed to describe the role of the image on your page. Many devices and browsers don’t display this text.
HTML anchor allows you to do “page jumping” to that specific image. Page jumping, also sometimes referred to as anchor links, is where you click a link and instantly get moved somewhere further up or down a long page.
To enable this, you put an HTML Anchor in your photo and create a link that jumps to the anchor.
The advanced tab also lets you add a CSS class to your block, allowing you to write custom CSS and style the image as you choose.
Note: Based on which style you choose for the image block in the Styles settings, WordPress automatically adds a CSS class to the image block under Additional CSS class(es). You can add additional classes with spaces.
Changelog
- Updated 2024-01-16
- Updated screenshots and content for 6.3
- Fixed text formatting consistecy
- Added missing alt text to screenshots
- Updated 2023-03-29
- Added the option to clear duotone
- Added information about the style settings tab
- Added caption button for Gallery
- Updated screenshot and Videos for 6.2
- Added Alt text
- Updated 2022-12-12
- Added color settings
- Updated 2022-11-20
- Adjusted images for mobile view
- Added caption for images
- Removed redundant content
- Updated 2022-08-21
- Added 6.0 screenshots and videos.Updated block toolbar with Add button and replace the info with the updated process for adding images to the gallery.Reordered the info to separate for the block toolbar and block sidebar. Adding Dimensions to the block settings with video.Updating the blosk settings for images.
- Adding details for image customizations with content, screenshots and video.
- Added ALT tags for images.
- Updated 2021-12-21
- Updated all screenshots for 5.9 with higher resolution.
- Added in a context related to the refactoring.
- Updated 2021-02-02
- Updated the 5.5 video with 5.6 gifs
- Updated all screenshots with 5.6
- Added details to Advanced block settings options
- Updated out-of-date contents
- Updated 2020-10-05
- Updated the video
- Updated 2020-09-14
- Updated 5.5 screenshots
- Updated Block toolbar new features
- Updated Block settings new features
- Updated 2020-06-18
- Added ‘Link back to blocks’ to the top of the page
- Updated 2020-04-24
- Added Drag & Drop multiple images to the Gallery block
- Added video to change the background color as group block
- Added updated UI displays for WordPress 5.4
- Added “More Options” to the Block Toolbar section and updated the existing once to fit other block descriptions.
- Reorganized the post into 3 sections: How to add gallery and images, Block Toolbar and Block Settings.
- Converted all reusable blocks to regular blocks.
- Created 2019-03-07